Build scope for this Neon Dominion opening guide
This opening guide has been checked against Q00P: Neon Dominion v1.0.0, release ID 20260801044240-nw1pdmr4xtkkl91s, validated on August 1, 2026. The release archive SHA-256 is 5acf6ac6774574479b8b6f503706b19232a24b1ae2b0b182ad0be56442a1b030.
The packaged game manifest records a ten-sector campaign, a 12-node permanent research tree, mouse, keyboard, and touch controls, and local browser progress. The package also records no external runtime dependencies or required network connection. This guide therefore ties its first-turn advice to a specific published Q00P build rather than to an unspecified strategy-game template.
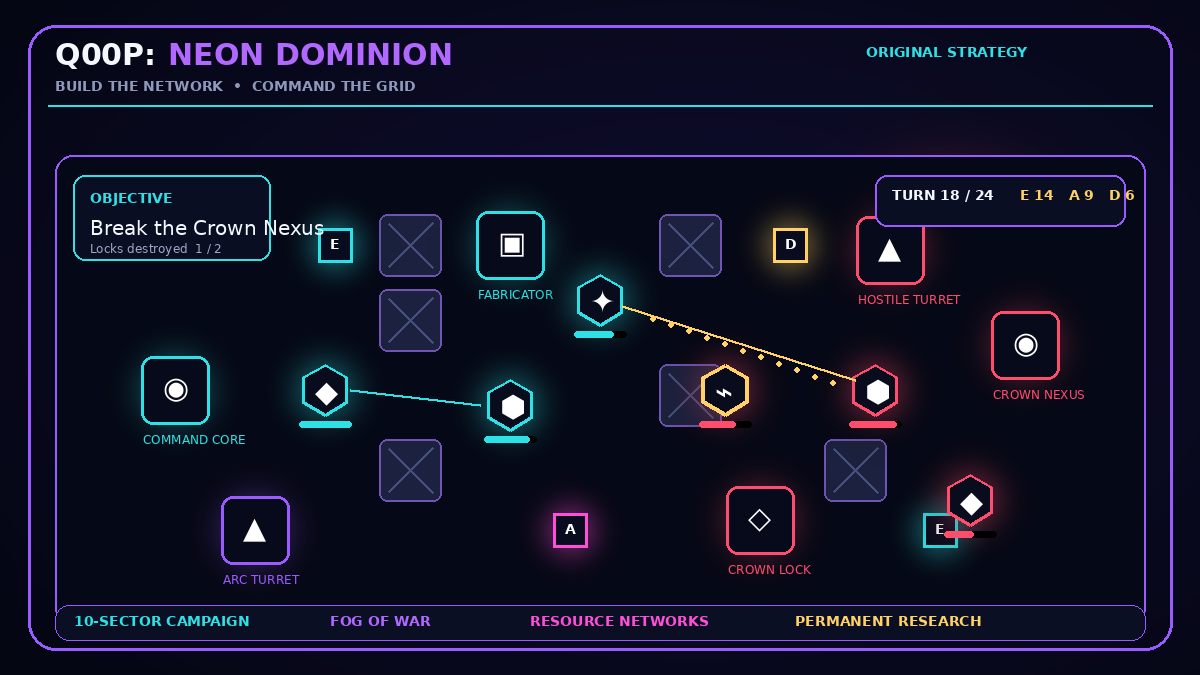
Neon Dominion rewards deliberate expansion more than frantic clicking. Each campaign sector gives you a Command Core, a tactical grid, a mission objective, and a limited starting economy. The Crown AI begins building its own network at the same time, so the opening turns matter. A good first five turns do not guarantee victory, but they create the resource flow, vision, and map control needed to make the middle game manageable.
This beginner guide explains a reliable opening framework rather than one fixed sequence. Sector layouts and objectives change, so the exact move can differ. The useful habit is to make every early action support one of three priorities: reveal the map, secure income, or protect the route between your Core and the objective.
Turn one: read the objective before moving
The objective appears in the upper interface. Do not assume every mission is a direct attack. Neon Dominion includes core assaults, survival defenses, relay-control battles, shielded command nodes, generator sieges, and other mission patterns. A unit that moves in the right direction for an assault may be badly positioned for a defense mission.
Before selecting a unit, identify:
- What must be protected or destroyed.
- Whether victory depends on time, territory, or a specific target.
- Which relays are closest to your starting network.
- Where walls and structures can provide cover.
- Which areas remain hidden by fog of war.
This short scan prevents the most common beginner mistake: sending every unit toward the first visible enemy while leaving the economy and Command Core exposed.
Use the Pulse Runner to create information
The Pulse Runner is the fastest capture specialist. In most openings, it should move toward a nearby relay or a position that reveals useful terrain. The goal is not to fight immediately. The goal is to increase the number of informed choices available on the next turn.
A Runner placed too far ahead can be isolated, so avoid ending movement beside multiple unknown tiles when the rest of the army cannot support it. A safer scouting move reveals the next lane, threatens a relay, and keeps a retreat path open.
Fog of war makes vision part of the economy. A relay you cannot see cannot be planned around, and a hostile turret discovered too late can force an expensive detour. Early information reduces wasted movement and helps you decide where the first forward structure belongs.
Capture Energy and Alloy early
Energy and Alloy are the foundation of a stable opening. Controlled relays generate resources at the start of each turn, which means capturing one turn earlier can influence every later decision. A player who delays the economy may still win a short fight but often reaches the middle game without enough resources to replace losses or build a forward network.
Energy supports many actions and structures. Alloy is important for deployment and construction. Data enables tactical protocols and should also be collected, but the first Data relay is not always more urgent than the resources needed to establish the army.
A practical early target is one reliable Energy relay and one reliable Alloy relay. Do not capture a distant node merely because it is available. A relay is useful only when you can defend it or recapture it without abandoning the main objective.
Keep the Aegis Sentinel between danger and value
The Aegis Sentinel is the frontline anchor. It is slower than a Runner, but it is better suited to holding a relay, blocking a lane, and absorbing pressure near important structures. During the opening, place the Sentinel where the Crown AI must deal with it before reaching the Core, a captured relay, or a vulnerable ranged unit.
Walls and adjacent structures provide cover. Use that terrain instead of placing the Sentinel in an open tile simply because it is closer to the enemy. One strong covered position can protect several future actions: a Runner can capture behind it, a Prism Lancer can fire past it, and a structure can be built next to the network without being exposed immediately.
The Sentinel should not chase every damaged target. Its value often comes from controlling a space that the enemy would otherwise use.
Put the Prism Lancer behind the line
The Prism Lancer provides ranged pressure. It performs best when another unit or a piece of terrain keeps enemies from reaching it easily. In the first turns, move it toward a firing lane rather than toward the center of danger.
Check line of sight before committing to a tile. A longer route to cover can be better than a direct route blocked by walls or structures. The Lancer should support the area you intend to hold, not stand alone on the opposite side of the map.
When an enemy moves into range, use the Lancer to weaken threats that would otherwise force the Sentinel or Runner to retreat. Avoid spending its attack on an unimportant target if a hostile structure, ranged enemy, or capture specialist presents a larger strategic risk.
Save the Cipher Hacker for the right target
The Cipher Hacker disables hostile structures. That ability becomes more valuable when turrets, shield pylons, and fortified positions appear. Beginners sometimes move the Hacker like a normal attacker and lose it before a breach begins.
Keep the Hacker close enough to support the main force but not at the front. When a turret or shielded route blocks progress, create a two-turn window by disabling the structure, then move the rest of the army through while the defense is inactive.
A Hacker can also extend your options in objectives where a structure matters more than a unit. Think of it as a timing tool: its best action changes the order in which the battlefield can be solved.
Build only when the structure solves a problem
Construction is powerful, but an early building consumes resources that could deploy a unit or activate a protocol. The first structure should have a clear purpose.
A forward War Fabricator reduces the travel time for replacement units. It is especially useful when the mission front is far from the original Core. An Arc Turret helps stabilize a lane. A Shield Pylon can protect and gradually repair nearby assets. Reactors, foundries, relays, and other structures expand the economy or network when placed where they can be defended.
Do not build because a command card is available. Build because the structure will generate resources, shorten reinforcement time, protect a key location, or make the objective easier to complete.
End the turn only after checking four things
Pressing Enter or the End Turn button gives the Crown AI its opportunity to build, move, capture, and attack. Before ending a turn, perform a quick check:
- Did every important unit use the movement or attack that matters?
- Are any unspent resources useful for an immediate deployment, structure, or protocol?
- Is the Command Core exposed to a path that just opened?
- Will an enemy capture a relay or reach a vulnerable unit on its next move?
You do not need to spend every resource. Saving Data for EMP Cascade, Repair Pulse, Deep Scan, or another tactical protocol can be correct. The purpose of the check is to avoid wasting actions by accident.
A flexible five-turn opening
A safe beginner pattern often looks like this:
- Read the objective and reveal the nearest route with the Runner.
- Capture a defensible Energy or Alloy relay.
- Move the Sentinel into cover between the enemy and the new relay.
- Position the Lancer behind the frontline and keep the Hacker protected.
- Decide whether the sector needs a forward Fabricator, a defensive anchor, another unit, or saved resources.
The order may change, but the logic remains useful. Information comes first, income follows, and combat is supported by positioning rather than started for its own sake.
What to do after the opening
Once the first network is stable, compare your resource income with the Crown AI's map control. If you own the safer economy, expand carefully and force the enemy to attack prepared positions. If the Crown controls more relays, use a Runner to threaten distant nodes while the main force creates a breach.
Campaign victories award Research. Early economy upgrades can make later sectors easier, while weapon and Rapid Fabrication upgrades support a more aggressive approach. Choose upgrades that match the problems you actually encountered rather than buying only the most dramatic option.
The best beginner opening in Neon Dominion is not a memorized build order. It is a sequence that produces information, income, and protected options. Read the mission, secure relays you can hold, use each specialist for its intended role, and end every turn with a plan for the Crown AI's response.